當Google Sites遇上Google Blogger會蹦出怎樣的火花呢?

編輯過程中可以隨時按下上方的預覽小圖示進行畫面預覽。
編輯完成後,我們就可以開始域名的綁定,首先按下上方的設定小圖示:


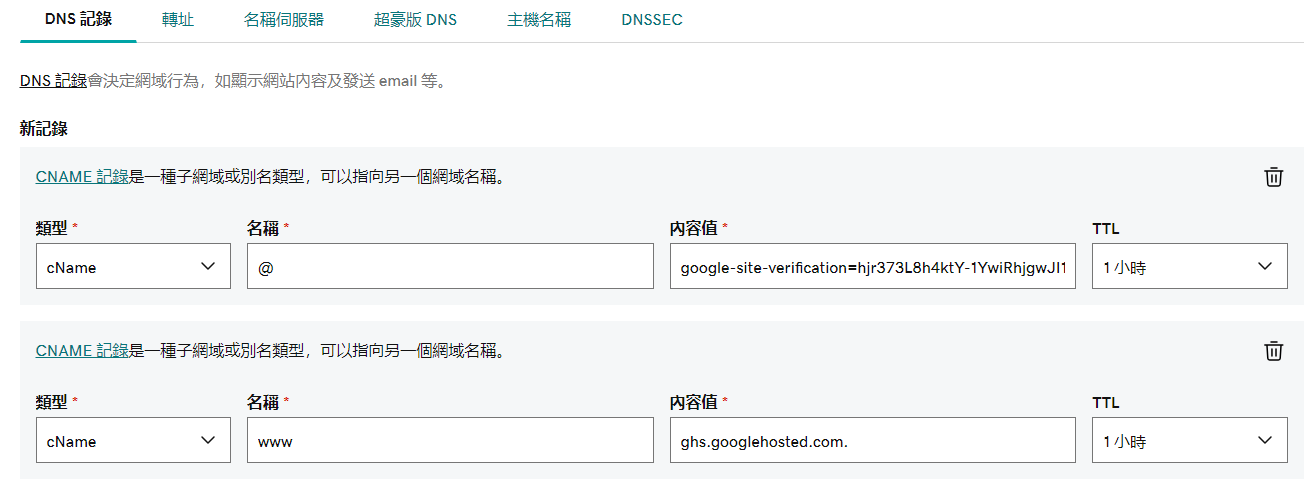
接著系統會指示我們需要新增一筆DNS記錄以便順利通過驗證:


這裏我們會需要新增2筆DNS記錄,除了一筆Google Sites驗證使用的記錄之外,還要新增一筆www前綴的cname記錄,内容值為ghs.googlehosted.com.,需特別注意的是,最後面的.是必須的。
新增完DNS記錄後,我們再次回到Google Sites域名驗證畫面,按下驗證開始進行驗證:
答案是免費的形象網站兼具部落格功能,您可能會覺得這真是了無新意,但對於剛創業的個人工作者或是小型工作室,這無非是一個節省成本的選項哦,除了節省成本外,Google Blogger也可以透過Google AdSense達到額外的收益,可説是一舉數得啊!
您可能會説wordpress.com或其他類似的服務也有免費的方案啊!沒錯,但是如果您要綁定域名的話,就得升級為付費方案才可以了!反觀Google Sites與Google Blogger在免費方案下,依然都是可以綁定域名,同時也具備SSL的保護呢!
下面就來簡單説説如何使用Google Sites和Google Blogger來搭建一個兼具部落格的形象網站吧,本次重點會著重在域名綁定的部分。
Google Sites
登入Google Drive,按下左上角的新增 > 更多 > Google協作平台,系統自動開啓新的Site編輯頁面,右側有很多的網頁元素供我們使用。


接著左側選單按下自定網域,再按下開始設定:

輸入我們申請的域名後,再按下驗證擁有權:

系統會自動將我們輸入的域名帶入下一個畫面,直接按下繼續即可:


此時我們會需要登入域名供應商提供的管理界面,該範例以GoDaddy為例,進入DNS管理的畫面後,按下新增記錄。


DNS記錄生效需要一段時間,如果驗證失敗,建議過幾個小時後再試試。
直到看到下面畫面,表示我們已經完成域名的綁定了。


最後再按下上方的發佈小圖示就完成了。
此時,我們應該可以透過 https://www.mydomain.com 順利訪問我們的網站了。

最後我們就可以把我們的網站發佈到Internet上面了,我們再次回到Google Sites編輯畫面,按下上方的發佈小圖示:

接著再按下上方的設定小圖示,進行發佈設定:
網址的部分就想一個唯一的名稱,這個名稱就不是很重要了, 因爲我們已經有綁定自己的域名了,日後會用我們的域名去訪問,而不會用 https://sites.google.com/view/xxxx 這個網址去訪問,沒問題按下儲存。

到這裏我們已經完成Google Sites的設定,我們緊接著繼續Google Blogger的設定。


再次登入域名供應商提供的管理界面,進入DNS管理的畫面後,按下新增記錄。

新增完DNS記錄後,我們再次回到Google Blogger域名驗證畫面,按下儲存開始進行驗證:
Google Blogger
登入Google Blogger,登入後在左上角按下新增網志,輸入標題後按下一步:

想一個唯一的子域名名稱并輸入下方網址輸入框。與Google Sites一樣,因爲我們會綁定域名,所以日後會用我們的域名訪問Google Blogger,而不會用 https://xxx.blogspot.com 這個網址來訪問,輸入後按下儲存即可。

接著我們進行自定網域的設定,在左側選單裏按下設定小圖示,接著找到自定網域:

在自訂網域上方按下滑鼠左鍵,輸入我們的域名(含子域名),範例中用blog為子域名,需注意的是,這裏的子域名必須和接下來要設定的DNS記錄一致,輸入完後按下儲存:

此時會跳出我們無法驗證你有權使用這個網域的提示,依照提示新增2筆DNS記錄:
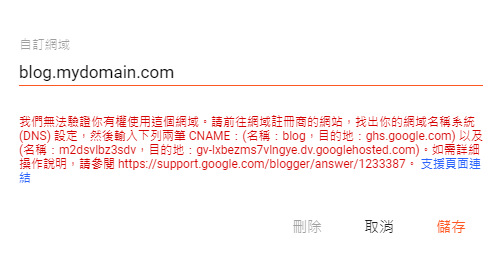
新增2筆cname記錄:

DNS記錄生效需要一段時間,如果驗證失敗,建議過幾個小時後再試試。
最後確定下面3個選項都有打勾:


此時,我們應該可以透過 https://blog.mydomain.com 順利訪問我們的Blogger了,同時可以著手開始寫文章了💪。
最後一里路
到這裏我們已經完成所有的設定了,爲了讓Google Sites與Google Blogger有一體的感覺,我們回到Google Sites編輯畫面,並在適當的位置插入一個連結,當用戶按下這個連結時,就可以導到我們的blog,同樣的在Google Blogger裏我們也可以插入一個連結,當用戶按下這個連結時,就可以回到我們的網站啦!
⚠️ Did you loose money to Cryptocurrency Investment, Forex Trading, Binary Option 📈 📉 or too any kind of Scam❗❕⁉️
回覆刪除Then You Should Conatct PYTHONAX Immediately ✔✔
ℹ PYTHONAX offer you a chance of recovering money you lost to this kind of scam, we are highly skilled with using transaction information to get back your money lost to this kind of Scams.
📢 The internet today is full of such kinda scams that promises a high profits returns, and when you decide to give it a shot, they just keep demanding for money of your money. This scams are very convincing with their promises and can even offer you a demo account trial, only to refuse to give you your product and your invested capital when you put in your money.
✅ Majority of cases we have dealt with, it turned out to be that the website used isn't even a legit Cryptocurrency or Forex trading platforms, every money you sent isn't in the website as the website isn't backed to the blockchain or stock market. Your money is just sitting their in the scams wallets or account.
⭐ Our services are simple and easy, as all wee need is proof of this scam, means of payment used and details of the payment made. With this information, we can use our skill to recover your money, though the process isn't easy, and requires a lot of hacking tools and softwares, however we will get your money back to you. We give you our word.
We also provide Hacking services such as-:
▪️Hacking Devices, for those trying to catch a cheating partner.
▪️Website Hacking, for those who need a copy of a file in a secure website or need something deleted from a website.
▪️Emails & Social Media account Hacking.
▪️Location tracking, both of past, current and later in the future.
▪️Bitcoin Mining........etc
Contact emails-:
Pythonaxhelp@protonmail.com
Pythonaxservices@protonmail.com
2024, Pythonax Services ™️.
Our reputation precedes us.
All rights reserved ®️